ESXi 5.5 u2 on ASRock Z97 Extreme6 with dual NIC support

I finally got around trying out the ASRock Z97 Extreme 6 motherboard and how it is supported by ESXi 5.5-u2. There seems to be quite a few issues with getting the Intel I218 to work on some Z97 boards, while the very same driver have been tested to work well on Z87 boards with the Intel I217 controller, for example the ASRock Z87 Extreme 6.

I recently found that a VMWare forum user called GLRoman had managed to compile an updated Intel e1000e driver that is required for this NIC. By the way, I encourage everyone interested in getting drivers to work for ESXi to read through this thread and the threads it’s linking too. Very interesting!

How to add Intel and Realtek drivers to an ESXi 5.5 U2 ISO

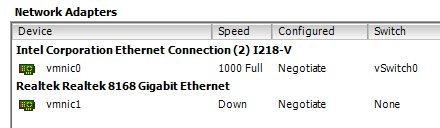
While I was at it I also decided to try to add Realtek drivers to the ESXi 5.5-u2 ISO in an attempt to get both NICs on the Z97 ASRock Extreme6 board to work. Please see my previous blog post on adding the updated Intel driver to an ISO. I used the very same method for this test with the addition of the Realtek drivers. In summary, these are the packages, including links to them, that are required to get both NIC operational.

The Intel driver is an offline bundle while the Realtek driver packages are VIB files. The Realtek VIBs are compressed to a zip file and need to be extracted for the EXSi-Customizer-PS script.

How to make ASRock Z97 Extreme 6 boot ESXi when installed on USB

As I have said earlier, I’m fond of installing ESXi to a USB stick to make it separated from the datastores. From what I have understood, ESXi is using GPT by default and I did not manage to get it to boot with UEFI in that way. I found that it is possible to add an option to the installation process which uses MBR instead of GPT.

During boot of the installation media, press SHIFT + O when promted. A prompt with “runweasel” will appear. Press space and add “formatwithmbr“, press enter to continue the installation as normal.

ESXi support for onboard AHCI SATA controller

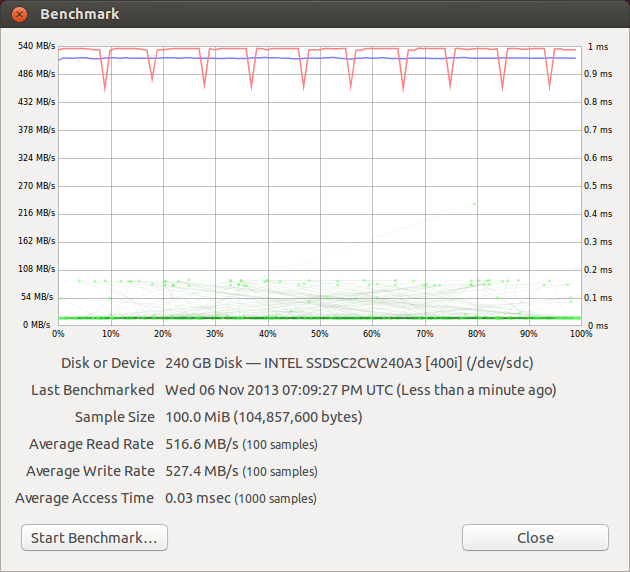
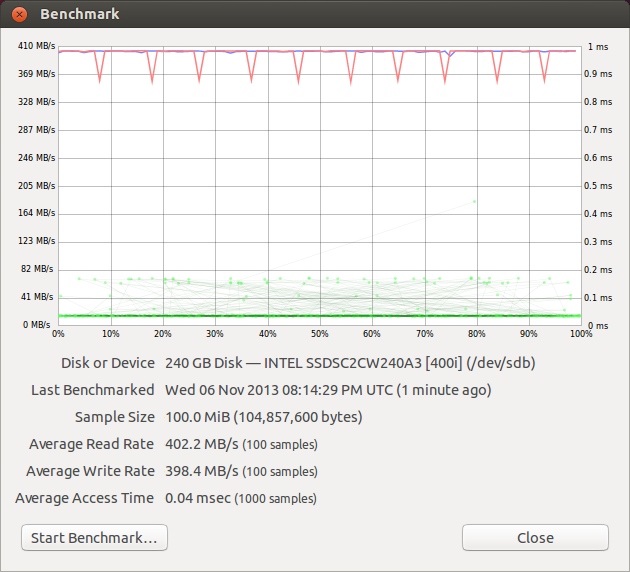
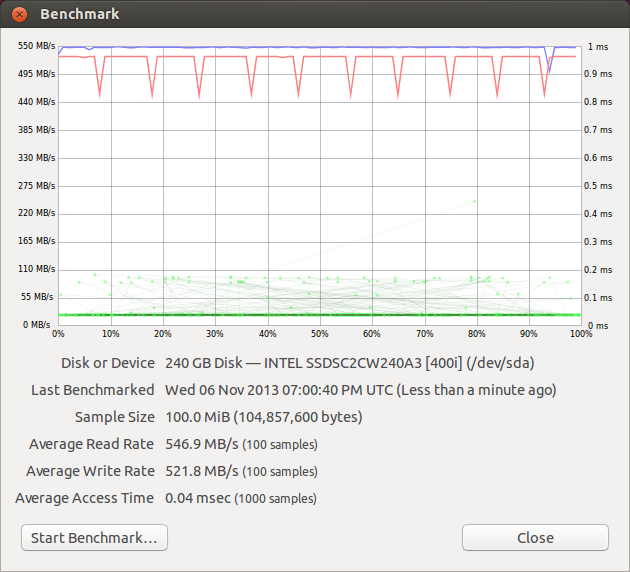
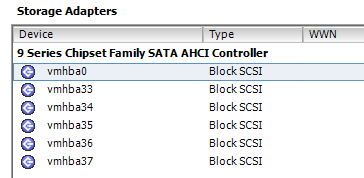
In the previous article I covered the issue of VMWare removing support for some onboard SATA controllers. I did not test whether or not ESXi 5.5 U2 would detect the onboard SATA AHCI controller on this motherboard without the sata-xahci driver package since I decided to include it right away. As can be seen from the screenshot below, the onboard Intel SATA controller is detected and it is possible to connect a HDD/SSD to these ports and use them for datastore. ESXi does not support onboard SATA RAID since it is a kind of software RAID.

sata_ahci

VT-d verification on the ASRock Z97 Extreme 6

Unfortunately, at the time of this test I did not have a VT-d capable CPU installed in the system. Therefore, I can not verify that VT-d is working with this board. From what I have read, it is possible to get VT-d to work on the Z97 chipset and other persons have managed to get it working on similar boards. Hopefully, I will have the chance to confirm this at a later point.

Conclusion

It is possible to make both onboard NICs on ASRock Z97 Extreme 6 available to ESXi 5.5 U2 by adding drivers for them to the ESXi ISO image. It is also possible to use the onboard SATA controller to connect drives and use them as datastores.

extreme6_nics

drivers

Align GPT partitions on 4K sector disks

I’m upgrading the storage in a offsite backup server to two new disks. The new disks are of 3TB each which pose some challenges when it comes to partitioning. Here is a quick background to this issue.

Why is it an issue to partition disks larger than 2TB?

Historically, data stored on the actual disks have been stored in 512 byte chunks, called a sector. 32 bit addressing of sectors creates the following limit:

512 bytes * 2^32 = 2199023255552 bytes = 2T bytes

And there you have it. Newer disks have transitioned to “4K”/4096 bytes physical sectors which extends this limit to 16TB. But…

Why is partition alignment crucial to storage performance?

To complicated things further, disks often expose 512 bytes logical sectors to the operating system for legacy support. This might cause tools to believe it is okay to begin and end a partition on any 512 byte sector border, which might not be a 4K byte sector border that is stored on the disk.

Hardware.info has a good article illustrating this.
Wikipedia on 4K / Advanced Format

How do you align partitions in Ubuntu with GNU Parted?

GNU Parted is a tool that supports GUID Partition Table, GPT, setup under Linux. Parted have some parameters to aid in the alignment of partition starts and ends. Let’s launch parted with:

$ sudo parted --align optimal /dev/sdX

Where sdX is the drive we intend to view and/or modify. The –align optimal is the aid in the alignment. In parted we can view the current partition table with the command print:

(parted) print
Model: ATA ST3000VX000-1CU1 (scsi)
Disk /dev/sdX: 3001GB
Sector size (logical/physical): 512B/4096B

As we can see, the drive has 4K physical sectors but presents 512 logical sectors. A tricky part I struggled with for hours was to calculate the partition sizes with the unit set to sectors. In my opinion, parted could be more clear on what sector size it presents to the user. To figure this out I issued the following:

(parted) unit B
(parted) print
Model: ATA ST3000VX000-1CU1 (scsi)
Disk /dev/sdX: 3000592982016B
...
(parted) unit s
(parted) print
Model: ATA ST3000VX000-1CU1 (scsi)
Disk /dev/sdX: 5860533168s

Making the calculation, bytes per sectors:

3000592982016B / 5860533168s = 512 byte/sector

So, even though this is a 4K drive, parted is using 512 byte sectors for viewing partition starts, ends and sizes.

Setting up partitions with parted

First, let’s setup a gpt partition table with the following command:

(parted) mklabel gpt

This was the partition layout I wanted to achieve:

Partition Size Usage
sdX1 8GB swap
sdX2 250GB /
sdX3 1200GB raid
sdx4 1542GB raid

Initially, I tried calculating the partition sizes using the sector unit to make sure that each partition border aligned with the physical sectors. Often, parted complained about the alignment with:

Warning: The resulting partition is not properly aligned for best performance.

What helped was to use the unit MB for the starts and ends. Here is the final parted commands:

mkpart primary 1 0% 8000MB
mkpart primary 2 8000MB 258000MB
mkpart primary 3 258000MB 1458000MB
mkpart primary 4 1458000MB 100%

Notes: Using 0% default to the first 1MB border that is correctly aligned. The same goes for 100% which makes sure the last partition aligns with the end of the disk. Here is the resulting partition layout:

(parted) unit s
(parted) print
Model: ATA ST3000VX000-1CU1 (scsi)
Disk /dev/sdX: 5860533168s
Sector size (logical/physical): 512B/4096B
Partition Table: gpt

Number Start End Size File system Name Flags
1 2048s 15624191s 15622144s 1 
2 15624192s 503906303s 488282112s 2
3 503906304s 2847655935s 2343749632s 3 raid
4 2847655936s 5860532223s 3012876288s 4 raid

(parted) unit compact
(parted) print
Model: ATA ST3000VX000-1CU1 (scsi)
Disk /dev/sdX: 3001GB
Sector size (logical/physical): 512B/4096B
Partition Table: gpt

Number Start End Size File system Name Flags
1 1049kB 8000MB 7999MB 1
2 8000MB 258GB 250GB 2
3 258GB 1458GB 1200GB 3 raid
4 1458GB 3001GB 1543GB 4 raid

To verify that the partitions are aligned, the following command can be executed, with P being the partition number:

(parted) align-check optimal P
P aligned

This became a long post. In the future I will try to cover handling alignment between the filesystem layer and the partitions.

Let me know how it goes for you!

Storage performance: Intel Z87 vs. ASMedia ASM1062 vs. LSI 9211-8i

During my VT-d verification on the ASRock Z86 Extreme6 I took the opportunity to compare the performance of three different storage controllers, namely:

  • Intel Z87 (onboard)
  • ASMedia ASM1062 (onboard)
  • LSI 9211-8i (PCI-Express 8x add in card)

Below is a summary of the test setup and the results of the tests.

Test System

Native performance

Comparison of the three controllers are done with the simple hard disk benchmark tool in Ubuntu 13.10.

SSD Performance

Average read [MB/s] Average write [MB/s] Average access time [ms]
Intel Z87 516.6 527.4 0.03
ASMedia ASM1062 402.2 398.4 0.04
LSI 9211-8i 546.9 521.8 0.04

Intel-SSD ASMedia-SSD LSI-SSD

HDD Performance

Average read [MB/s] Average write [MB/s] Average access time [ms]
Intel Z87 140.3 136.1 12.4
ASMedia ASM1062 140.3 136.0 12.5
LSI 9211-8i 140.3 136.6 12.4

Intel-HDD ASMedia-HDD LSI-HDD

Passthrough Performance

Passthrough performance is measured with ESXi 5.5 installed on a USB memory and the LSI card passed through to a VM. The VM is running the same version as in the above benchmarks, ubuntu 13.10. The performance is only run with the LSI card. I really tried getting passthrough working with the ASMedia controller as this would open up to some interesting storage opportunities with this board. However, Ubuntu recognized the controller but did not find any disk attached to it. Also, now that I think about it, I have no idea why I did not think about trying to pass through the Z87 controller. Anyway, here is the comparison, SSD and HDD combined.

Average read [MB/s] Average write [MB/s] Average access time [ms]
SSD – Native 546.9 521.8 0.04
SSD – Passthrough 519.3 520.2 0.06
HDD – Native 140.3 136.6 12.4
HDD – Passthrough 140.3 136.4 12.4

LSI-SSD LSI-SSD-passt

LSI-HDD LSI-HDD-passt

Final thoughts

The ASMedia controller is not capable of handling the performance of modern SSDs. For mechanical drives there is practically no difference between the three different controllers.

I had an idea of using the Intel controller for the ESXi datastore and pass through the ASMedia controller to a VM. Then it would be possible to setup software RAID for the drives connected to the ASMedia controller. This is a solution working very well for me today with the LSI card, but it would have been nice to have an all-in-one solution.

There are some performance impacts on reads when passing through the LSI card to a VM. I have not investigated this further but it might very well be benchmark technical reasons behind it.

Some quick HDD and SSD benchmarks

I have been able to run some benchmarks on various hard drives and a solid state drive. Mostly for my own amusement to see how old drives compares to new drives. There are some desktop drives as well as some enterprise drives. Perhaps the numbers can be useful for someone.

The drives

Listed in some kind of old/slow to new/fast

  • Seagate Barracuda 7200.11 (ST31500341AS), 1.5TB
  • Seagate Barracuda 7200.12 (ST500DM002), 500GB
  • Samsung SpinPoint F3 (HD502HJ), 500GB
  • Hitachi GST Deskstar 7K1000.D (HDS721010DLE630), 1TB
  • Western Digital Red (WD20EFRX), 2TB
  • Seagate SV35.6 Series (ST2000VX000), 2TB
  • Seagate Constellation CS (ST2000NC000), 2TB
  • Seagate Constellation ES (ST3000NM0033), 3TB
  • Intel 520 SSD (SSDSC2CW240A3), 240GB

Test system

  • Asus P8Z68-V (Intel Z68 chipset)
  • Intel 2600K
  • 2x4GB RAM
  • Ubuntu Desktop 10.04.3
  • Ubuntu Disk application used for the benchmarks

The system is kind of old, but I have collected the numbers for some time and wanted to run the drives on the same platform. The drives were connected to the onboard SATA-III/6G ports, connected to the Z68 chipset.

*Update* I believe I have screwed up and actually used the SATA 3G ports for some of the drives. I will rerun the benchmark with the Constellation ES and SSD drive and update this post. The other drives are in production and I’m unable to test them.

Results

ST31500341AS ST500DM002 HD502HJ HDS721010DLE630 WD20EFRX ST2000VX000 ST2000NC000 ST3000NM0033 SSDSC2CW240A3

Reflections

I am not going to do an in depth analysis of the results, since I realize the procedure was way too sloppy. There are some really strange write results for the Constellation ES drive shown here. I tried running the same benchmark with Ubuntu 12.04 and it was more consistent with less spikes/dips.

Hopefully I will be able to post some other interesting benchmarks soon.

Moving an Ubuntu Server installation to a new partition scheme

My previous post covered how to clone an Ubuntu Server installation to a new drive. That method covered cloning between identical drives and identical partition schemes. However, I have grown out of space on one of the file servers which have the following layout:

   Device Boot      Start         End      Blocks   Id  System
/dev/sda1   *        2048  2146435071  1073216512   83  Linux
/dev/sda2      2146435072  2147483647      524288    5  Extended
/dev/sda5      2146437120  2147479551      521216   82  Linux swap

The issue now is that if increase the size of the drive, I can not grow the filesystem since the swap is at the end of the disk. Fine, I figured I could remove the swap, grow the sda1 partition and then add the swap at the end again. I booted up the VM to a Live CD, launched GParted and tried the operation. This failed with the following output:

resize2fs: /dev/sda: The combination of flex_bg and 
!resize_inode features is not supported by resize2fs

After some searching and new attempts with a stand alone Gparted Live CD I still got the same results. Therefor, I figured I could try to copy the installation to a completely new partition layout.

Process

Setup the new filesystem

Add the new (destination) drive and the old (source) drive to the VM and boot it to a Live CD, preferable with the same version as the source OS. Setup the new drive as you like it to be. Here is the layout of my new (sda) and old drive (sdb):

   Device Boot      Start         End      Blocks   Id  System
/dev/sda1            2048     8390655     4194304   82  Linux swap / Solaris
/dev/sda2         8390656  4294965247  2143287296   83  Linux
   Device Boot      Start         End      Blocks   Id  System
/dev/sdb1   *        2048  2145386495  1072692224   83  Linux
/dev/sdb2      2145388542  2147481599     1046529    5  Extended
/dev/sdb5      2145388544  2147481599     1046528   82  Linux swap / Solaris

Copy the installation to the new partition

For this I use the following rsync command:

$ sudo rsync -ahvxP /mnt/old/* /mnt/new/

Time to wait…

Fix fstab on the new drive

Identify the UUIDs of the partition:

$ ll /dev/disk/by-uuid/

5de1...9831 -> ../../sda1
f038...185d -> ../../sda2

Remember, we changed the partition layout so make sure you pick the right ones. In this example, sda1 is swap and sda2 is the ext4 filesystem.
Change the UUID in fstab:

$ sudo nano /mnt/new/etc/fstab

Look for the following lines and change the old UUIDs to the new ones. Once again, the comments in the file is from initial installation, do not get confused of them.

# / was on /dev/sda1 during installation
UUID=f038...158d / ext4 discard,errors=remount-ro 0 1

# swap was on /dev/sda5 during installation
UUID=5de1...5831 none swap sw 0 0

Save (CTRL+O) and exit (CTRL+X) nano.

Setup GRUB on the new drive

This is the same process as in the previous post, only the mount points are slightly different this time:

$ sudo mount --bind /dev /mnt/new/dev
$ sudo mount --bind /dev/pts /mnt/new/dev/pts
$ sudo mount --bind /proc /mnt/new/proc
$ sudo mount --bind /sys /mnt/new/sys
$ sudo chroot /mnt/new

With the help of chroot, the grub tools will operate on the virtual drive rather than the live session. Run the following commands to re-/install the boot loader again.

# grub-install /dev/sda
# grub-install --recheck /dev/sda
# update-grub

Lets exit the chroot and unmount the directories:

# exit
$ sudo umount /mnt/new/dev/pts
$ sudo umount /mnt/new/dev
$ sudo umount /mnt/new/proc
$ sudo umount /mnt/new/sys
$ sudo umount /mnt/new

Cleanup and finalizing

Everything should be done now to boot into the OS with the new drive. Shutdown the VM, remove the old virtual drive from the VM and remove the virtual Live CD. Fire up the VM in a console and verify that it is booting correctly.

As a friendly reminder – now that the VM has been removed and re-added to the inventory it is removed from the list of automatically started virtual machines. If you use it, head over to the host configuration – Software – Virtual Machine

Cloning a virtual hard disk to a new ESXi datastore

One physical drive of my ESXi host is starting to act strange and after a couple of years I think it is a good idea to start migrating to a new drive. Unfortunately, I do not do this often enough to remember the process. Therefor, I intend to document it here and it could hopefully be of help to someone else.

Precondition

  • ESXi 5.1
  • Ubuntu Server 12.04 virtual machine on “Datastore A”
  • VM hard disk is thin provisioned

Goal

  • Move the VM to “Datastore B”
  • Reduce the used space of the VM on the new datastore

The VM was set up with a 1TB thin provisioned drive and the initial usage was up to 400GB. Later on I moved the majority of the used storage to a separate VM and the usage now is around 35GB. However, the previously used storage is not freed up and I intend to accomplish this by cloning the VM to a new virtual disk. As far as I know, there are other methods to free up space but I have not tried any of those yet. To be investigated…

Process

  1. Add new thin virtual hard disk to the VM of the same size on the new datastore
  2. Boot the VM to a cloning tool (I have used Acronis, but there are other free competent alternatives)
  3. Clone the old drive to the new one keeping the same partition setup
  4. Shut down the VM and copy the .vmx-file to the same folder as the .vmdk on the new datastore (created in step 1)
  5. Remove the VM from the inventory. Do not delete the files from the datastore
  6. Browse the new datastore, right click on the copied .vmx-file and select Add to inventory
  7. Edit the settings of the VM to remove the old virtual drive.
  8. Select a Ubuntu Live CD image (preferable the same version as the VM) for the virtual CD drive.
  9. Start the VM. vSphere will pop up a dialogue asking if the VM was moved or copied, select moved.
  10. Boot the VM to a Ubuntu Live CD to fix the mounting and grub
  11. Boot into the new VM

Let’s explain some steps in greater detail.

4. Copy the VMX file

If this is the initial state:

DatastoreA/VM/VM.vmdk
DatastoreA/VM/VM.vmx

After adding a second drive, VM_B.vmdk, on the other datastore (step 1), cloning VM.vmdk to VM_B.vmdk (step 3) and copying the VM.vmx to the VM-folder on datastoreB (step 4), the layout would be the following:

DatastoreA/VM/VM.vmdk
DatastoreA/VM/VM.vmx

DatastoreB/VM/VM_B.vmdk
DatastoreA/VM/VM.vmx

10. Boot the VM to a Ubuntu Live CD to fix mounts and grub

This section is heavily dependent on the guest OS. Ubuntu 12.04 uses UUID’s to mount drives and to decide which drive to boot from. The new virtual drive will have a different UUID than the original drive and will therefor not be able to boot the OS. This is where the Live CD comes in.

Once inside the Live CD, launch a terminal and orientate yourself. To identify the UUIDs of the partition use:

$ ll /dev/disk/by-uuid/

5de1...9831 -> ../../sda1
f038...185d -> ../../sda2

Next, let’s mount the drive:

$ sudo mount /dev/sdXY /mnt

where X is the drive letter and Y is the root partition.(If you have some exclusive partitioning setup you might need to mount the other partitions to be able to follow these steps. But then again, you probably know what you are doing anyway)

Change the UUID in fstab:
$ sudo nano /mnt/etc/fstab
Look for the following lines and change the old UUIDs to the new ones.

# / was on /dev/sda2 during installation
UUID=f038...158d / ext4 discard,errors=remount-ro 0 1

# swap was on /dev/sda1 during installation
UUID=5de1...5831 none swap sw 0 0

Next up is changing the grub device mapping. The following steps have I borrowed from HowToUbuntu.org (How to repair, restore of reinstall Grub).

$ sudo mount --bind /dev /mnt/dev
$ sudo mount --bind /dev/pts /mnt/dev/pts
$ sudo mount --bind /proc /mnt/proc
$ sudo mount --bind /sys /mnt/sys
$ sudo chroot /mnt

With the help of chroot, the grub tools will operate on the virtual drive rather than the live OS. Run the following commands to re-/install the boot loader again.

# grub-install /dev/sda
# grub-install --recheck /dev/sda
# update-grub

Lets exit the chroot and unmount the directories:

# exit
$ sudo umount /mnt/dev/pts
$ sudo umount /mnt/dev
$ sudo umount /mnt/proc
$ sudo umount /mnt/sys
$ sudo umount /mnt

Now we should be all set. Shut down the VM, remove the virtual Live CD and boot up the new VM.

Two new IBM ServeRAID M1015 cards

I found two additional IBM ServeRAID cards on a Swedish forum at a price too good to pass on. These were server pulls and did not have any PCI bracket. I had a box of old computer parts and found two Firewire cards which had one hole that fit the M1015 card. This is good enough and better than paying $10×2 for two brackets on Ebay. As for the cables, my previous experience with Deconn, also on Ebay, was only positive and I ordered 4 cables to fully equip the new cards.

cable

Of course, the first thing I did was to flash the cards to the latest LSI P16 firmware. This time around though, I flashed one card with the IT firmware and omitting the BIOS, and the other with the IR firmware with BIOS. The IT firmware just pass on the disks to the OS while the IR firmware makes it possible to setup RAID 0, 1 or 10 as well as passing on non-RAID disks to the OS. This combination of RAID and pass on disks is something the IBM firmware cannot do.

As soon as I get some decent disks I will see how the card behaves in a Windows computer.

SATA hotswap drive in mdadm RAID array

I needed to replace a SATA drive in a mdadm RAID1 array and I figured I could try to do a hot swap. Before the step-by-step guide, this is how the system is set up for an orientation.

  • 2x1TB physical disks; /dev/sdb and /dev/sdc
  • Each drive contains one single partition; /dev/sdb1 and /dev/sdc1 respectively
  • /dev/sdb1 and /dev/sdc1 together make up the /dev/md0 RAID1 array

Here is what the array looks like:

$ cat /proc/mdstat
Personalities : [linear] [multipath] [raid0] [raid1] [raid6] [raid5] [raid4] [raid10]
md0 : active raid1 sdb1[0] sdc1[1]
976629568 blocks super 1.2 [2/2] [UU]

In the following steps we will remove one drive from the array, remove it physically, add the new physical drive and make mdadm rebuild the array.

Important note!
Since we’re removing one of the drives in a RAID1 set we do not have any redundancy anymore. If this is critical data on the array, this is the time to make a proper backup of it. The drive I’m removing is not faulty in any way and therefor I will not take any backups.

Step-by-step guide

  1. Mark the drive as failed
    $ sudo mdadm --manage /dev/md0 --fail /dev/sdb1
  2. Remove the drive from the array
    $ sudo mdadm --manage /dev/md0 --remove /dev/sdb1
  3. View the mdadm status
    $ cat /proc/mdstat
  4. If you prefer to shut down the system for a cold swap, do it now. Before the hot swap put the drive into standby with the following command
    $ sudo hdparm -Y /dev/sdb
    Make sure you know which drive you are going to remove before issuing this command. Operations to the disk will wake up the drive again.
  5. Remove the SATA signal cable first and then the SATA power cable.
  6. Mount the new drive and connect SATA power. I let the drive spin up for 5-10 seconds before connecting the SATA signal cable. If you did a cold swap, power on the system at this point.
  7. Identify the new drive and what device name it has. In my case, the new drive was conveniently named /dev/sdb, the same as the old one.
  8. Copy the partitioning setup from the other drive in the array to the new disk.
    Make sure the order is correct, otherwise we will erase the operational drive!
    $ sfdisk -d /dev/sdc | sfdisk /dev/sdb
  9. Add the new drive to the RAID array
    $ sudo mdadm --manage /dev/md0 --add /dev/sdb1
  10. The RAID array will now be rebuilt and the progress is indicated by the
    $ cat /proc/mdstat
    output. To have a more dynamic update of the progress use the following:
    $ watch cat /proc/mdstat

When the rebuild is done the status will look something like this again:

$ cat /proc/mdstat
Personalities : [linear] [multipath] [raid0] [raid1] [raid6] [raid5] [raid4] [raid10]
md0 : active raid1 sdb1[2] sdc1[1]
976629568 blocks super 1.2 [2/2] [UU]

Enjoy and be careful with your data!

Raw Device Mappings in ESXi 5.1

Raw Device Mapping (RDM) is a a method to pass a physical drive (that is detected by ESXi) to a virtual machine without first creating a Datastore and a virtual hard disk inside it.

Here is how to setup a drive with RDM to a VM:

  1. Enable SSH on the host. Log in to the physical ESXi host. Under Troubleshooting Options select Enable SSH.
  2. Log in to the host with your favorite SSH client
  3. Find out what the disk is called by issuing the command:
    ls -l /vmfs/devices/disks/
    The device is called something like:
    t10.ATA_____SAMSUNG_HD103SJ___________S246JDWS90XXXX______
    Make sure you determine the correct drive to use for the RDM. Entries with the same beginning as above but ending with :1 is a partition. This is not what you want, you want to map the entire drive.
  4. Find your datastore by issuing the command:
    ls -l /vmfs/volumes/

    It should be named something like:
    Datastore1 -> 509159-bd99-…
  5. Go to your Datastore by issuing the command:
    cd /vmfs/volumes/
    Datastore1
    (Type ls and you will see the content of this Datastore)
  6. Here comes the actual mapping. Issue the command:
    vmkfstools -z /vmfs/devices/disks/<name of disk from step 3> <RDM>.vmdk
    Where you replace the <name of disk from step 3> with the actual disk name and <RDM>with what you would like to call the RDM. A concrete example:vmkfstools -z /vmfs/devices/disks/t10.ATA_DISKNAME_ SamsungRDM.vmdk
  7. Log in to the vSphere client
  8. Shutdown the virtual machine that you want to add the RDM to
  9. Open the settings for the virtual machine
  10. Under hardware tab, click Add…
  11. Select Hard Disk and press Next
  12. Select Use an existing virutal disk
  13. Press Browse, go to the datastore we found in step 4 and select theSamsungRDM.vmdk we created in step 6.
  14. Press Next, Next and Finish to finalize the add hardware guide.

The hard drive is now added to the VM. Just start it up and start using the drive.

Note 1: I was trying to be a smart ass by using the path /dev/disks/ instead of /vmfs/devices/disks/ to point out the disk for theĀ vmkfstools and it refused to accept it.

Note 2: SMART monitoring does not work on drives used as RDM.

Cross Flashing of IBM ServeRAID M1015 to LSI SAS9211-8i

Finally, the RAID card and SATA cables have arrived. The card was back ordered from the retailer I decided to buy from. Now they’re in stock though and can be found here: IBM SERVERAID M1015 6GB SAS/SATA

Why on earth did you buy an OEM card?

Please read my post SATA Expansion Card Selection.

I also scored some neat cables from Ebay. Here in Sweden, one SFF-8087 cable in the standard red SATA color would cost 150SEK ($22) if I bought one at the same time as the RAID card (no extra shipping cost). Two cables of the same type but with black sleeves over silver cables including shipping from Singapore, 100SEK ($15). The choice was simple…

In my prestudy for a suitable controller I found that it was possible to flash certain OEM cards with the original manufacturer’s firmware and BIOS to change the behavior of the card. The IBM ServeRAID is equivalent with a LSI SAS9240 card and it can be flashed into a LSI SAS9211-8i.

All information on how to flash the M1015 card into a LSI SAS9211-8i can be found in this excellent article at ServeTheHome. The content and instructions are updated so I am not going to put them here in case some major changes occur.

As it happens, the process of flashing these cards does not work with any motherboard. The sas2flsh tool refused to work in the following two boards (PAL initialization error)

  • Intel DQ77MK (Q77 chipset, socket 1155, tried PCIe 16x slot)
  • Intel DG965RY (G965 chipset, socket 775, tried PCIe 16x slot)

The following board worked for me:

  • Asus P5QPL-AM (G41 chipset, socket 775, PCIe 16x slot)

For more information and experiences of the flash process, visit this LaptopVideo2Go Forum Post

Here are some additional information that might be useful to an interested flasher

The board is up and running in the ESXi host now and I will run some benchmarks to compare the performance difference between a Datastore image, a Raw Device Mapped (RDM) drive and a drive connected to the LSI controller and passed through to the VM.