Manage an LSI MegaRAID card in ESXi host remotely with MSM

Here is a quick post on how to remotely manage an LSI MegaRAID card in an ESXi host with MegaRAID Storage Manager, aka MSM.

Setup

  • ESXi 5.5 u2 host
  • LSI MegaRAID SAS 9261-8i (this guide will work on most 926x and 927x cards)
  • Windows 7 SP1 physical client

Required software

How to get it working

I have read multiple guides on doing this very simple thing. However, most of the tricks did not work or was not an issue for me. Here is what was needed for me to get it working with this setup.

  1. Make sure the LSI SMIS provider is working. Do you get health indications from the RAID card in vSphere? Installed software components. If not; stop here, install it and make sure it is working.
  2. Enable SSH on the host and connect to the host over SSH
  3. View the hosts file with cat /etc/hosts
  4. Copy the line with the IP address to the server, for example:
    172.17.1.1  hostname.domain hostname
  5. On the client Windows machine, edit the hosts file* and add a row for each hostname found in step 4, for example:
    172.17.1.1  hostname.domain
    172.17.1.1  hostname
  6. Start LSI MSM from the client. Change the search setting to ESXIMON servers, save, and then enter the IP of the local machine (not the host IP) in the search field.MegaRAID_storage_manager_host_configuration
  7. Hit search and the host should appear with the correct hostname and IP.MSM-search-results

(*) Right click on a link to Notepad (or a custom text editor) and choose Run as administrator. Select File – Open, and enter the following file name:

C:\Windows\System32\drivers\etc\hosts

I hope this helps the RAID administration! Let me know if you succeed or not in the comments.

ESXi 5.5 u2 on ASRock Z97 Extreme6 with dual NIC support

I finally got around trying out the ASRock Z97 Extreme 6 motherboard and how it is supported by ESXi 5.5-u2. There seems to be quite a few issues with getting the Intel I218 to work on some Z97 boards, while the very same driver have been tested to work well on Z87 boards with the Intel I217 controller, for example the ASRock Z87 Extreme 6.

I recently found that a VMWare forum user called GLRoman had managed to compile an updated Intel e1000e driver that is required for this NIC. By the way, I encourage everyone interested in getting drivers to work for ESXi to read through this thread and the threads it’s linking too. Very interesting!

How to add Intel and Realtek drivers to an ESXi 5.5 U2 ISO

While I was at it I also decided to try to add Realtek drivers to the ESXi 5.5-u2 ISO in an attempt to get both NICs on the Z97 ASRock Extreme6 board to work. Please see my previous blog post on adding the updated Intel driver to an ISO. I used the very same method for this test with the addition of the Realtek drivers. In summary, these are the packages, including links to them, that are required to get both NIC operational.

The Intel driver is an offline bundle while the Realtek driver packages are VIB files. The Realtek VIBs are compressed to a zip file and need to be extracted for the EXSi-Customizer-PS script.

How to make ASRock Z97 Extreme 6 boot ESXi when installed on USB

As I have said earlier, I’m fond of installing ESXi to a USB stick to make it separated from the datastores. From what I have understood, ESXi is using GPT by default and I did not manage to get it to boot with UEFI in that way. I found that it is possible to add an option to the installation process which uses MBR instead of GPT.

During boot of the installation media, press SHIFT + O when promted. A prompt with “runweasel” will appear. Press space and add “formatwithmbr“, press enter to continue the installation as normal.

ESXi support for onboard AHCI SATA controller

In the previous article I covered the issue of VMWare removing support for some onboard SATA controllers. I did not test whether or not ESXi 5.5 U2 would detect the onboard SATA AHCI controller on this motherboard without the sata-xahci driver package since I decided to include it right away. As can be seen from the screenshot below, the onboard Intel SATA controller is detected and it is possible to connect a HDD/SSD to these ports and use them for datastore. ESXi does not support onboard SATA RAID since it is a kind of software RAID.

sata_ahci

VT-d verification on the ASRock Z97 Extreme 6

Unfortunately, at the time of this test I did not have a VT-d capable CPU installed in the system. Therefore, I can not verify that VT-d is working with this board. From what I have read, it is possible to get VT-d to work on the Z97 chipset and other persons have managed to get it working on similar boards. Hopefully, I will have the chance to confirm this at a later point.

Conclusion

It is possible to make both onboard NICs on ASRock Z97 Extreme 6 available to ESXi 5.5 U2 by adding drivers for them to the ESXi ISO image. It is also possible to use the onboard SATA controller to connect drives and use them as datastores.

extreme6_nics

drivers

Adding multiple drivers to an ESXi 5.5 u2 ISO

The calm before the storm

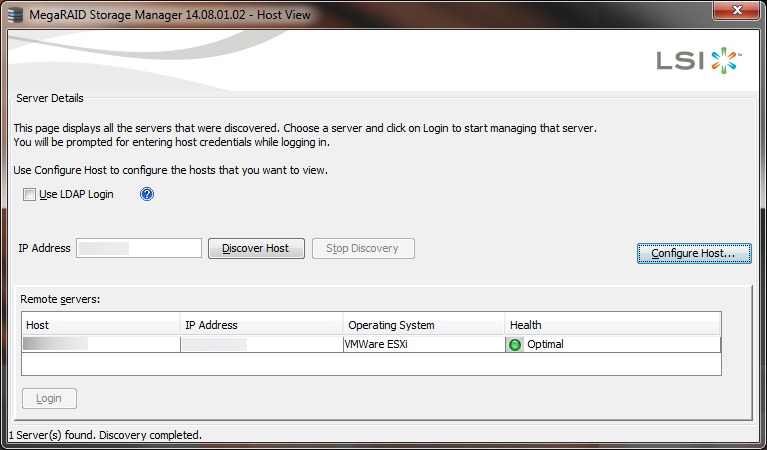
My VMware ESXi based home server has been working really well for the last 2 years and I have not felt the need to upgrade it. That is the longest I can handle “don’t fix it if it ain’t broken” 😉

Background and motivation

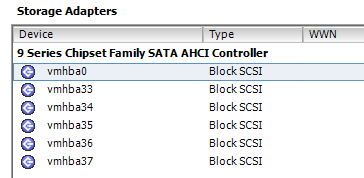
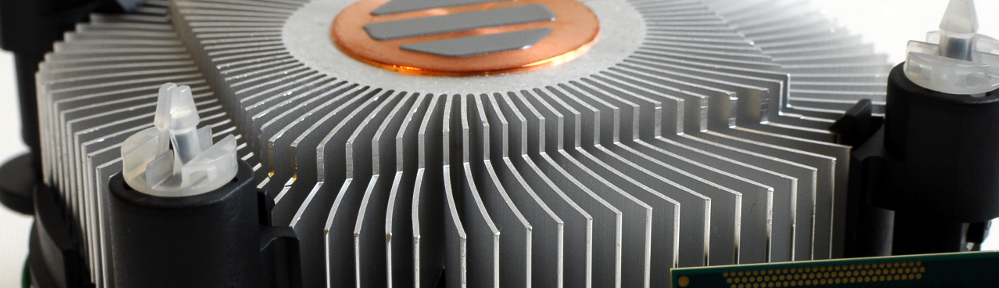
The main reason for this upgrade is to move from a solution with a single HDD connected to the onboard SATA controller, to a battery backed hardware RAID controller (LSI 9261-8i). I guess I have been lucky, but let’s not celebrate too early!

Anyway, this article is about preparing a new ESXi ISO with all the drivers needed for the transition from ESXi 5.1 to ESXi 5.5-u2. Although I have not been reading very actively on this topic lately, I do have picked up a few things to consider for this upgrade:

  • VMware have been removing SATA AHCI mappings for some onboard controllers. This might be an issue since I intend to move the existing VMs from the single drive to the RAID:ed disks.
  • ESXi 5.5 u2 have drivers for the LSI 9261-8i card but there are newer ones, I might as well include the latest release.
  • Speaking of the RAID controller, there is also a “SMIS provider” VIB to be able to manage the RAID controller in the host remotely. To be honest, I need to learn more about this and the first step is to include this functionality.
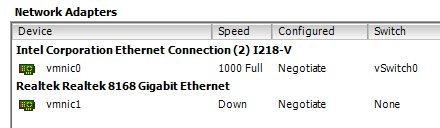
  • Still no native support for one of the Intel NICs on this board (Intel DQ77MK motherboard with Intel 82579LM and 82574L NICs). Therefore, NIC drivers need to be included.
  • Finally, since this motherboard is more than 2 years old, at least since I last updated the BIOS, I’m going to include a CPU microcode update pack.

Preparing to include drivers in an ESXi 5.5-u2 ISO

Previously, I have been using the graphical ESXi-Customizer tool to add drivers to an ISO, but this time I will attempt to use the PowerShell script version

Here is a recipe for the tool chain:

Here is a summary of the drivers to be included.

The ESXi-Customizer-PS has a really nice feature where it is possible to make it load an entire directory with files to be included. I created an offline_bundles subfolder from where I put the ESXi-Customizer-PS script and copied all files to it.

Executing the ESXi-Customizer-PS script

I’m a complete PowerShell noob and it took me a while to just make it run the script. I had to run the following command to allow script:

Set-ExecutionPolicy Unrestricted

Navigate to the ESXi-Customizer script folder and run the following command:

.\ESXi-Customizer-PS-v2.3.ps1 -pkgDir .\offline_bundles -izip .\update-from-esxi5.5-5.5_update02-2068190.zip -nsc

To make it easier to read, here it is again broken into multiple rows:

.\ESXi-Customizer-PS-v2.3.ps1 
-pkgDir .\offline_bundles
-izip .\update-from-esxi5.5-5.5_update02-2068190.zip 
-nsc

A successful output looks something like this:

Script to build a customized ESXi installation ISO or Offline bundle using the VMware PowerCLI ImageBuilder snapin
(Call with -help for instructions)

Running with PowerShell version 2.0 and VMware vSphere PowerCLI 5.8 Release 1 build 2057893

Adding base Offline bundle .\update-from-esxi5.5-5.5_update02-2068190.zip ... [OK]

Getting ImageProfiles, please wait ... [OK]

Using ImageProfile ESXi-5.5.0-20140902001-standard ...
(dated 08/23/2014 06:46:46, AcceptanceLevel: PartnerSupported,
For more information, see http://kb.vmware.com/kb/2079732.)

Loading Offline bundles and VIB files from .\offline_bundles\ ...
   Loading D:\Linux\ESXi5.5u2VIBs\offline_bundles\cpu-microcode-1.5.0-1-offline_bundle.zip ... [OK]
      Add VIB cpu-microcode 1.5.0-1 [OK, added]
   Loading D:\Linux\ESXi5.5u2VIBs\offline_bundles\igb-5.2.7-1331820-offline_bundle-2157967.zip ... [OK]
      Add VIB net-igb 5.2.7-1OEM.550.0.0.1331820 [OK, replaced 5.0.5.1.1-1vmw.550.1.15.1623387]
   Loading D:\Linux\ESXi5.5u2VIBs\offline_bundles\megaraid_sas-6.605.00.00-offline_bundle-2132901.zip ... [OK]
      Add VIB scsi-megaraid-sas 6.605.00.00-1OEM.550.0.0.1331820 [OK, replaced 5.34-9vmw.550.2.33.2068190]
   Loading D:\Linux\ESXi5.5u2VIBs\offline_bundles\net-e1000e-3.1.0.2-glr-offline_bundle.zip ... [OK]
      Add VIB net-e1000e 3.1.0.2-glr [New AcceptanceLevel: CommunitySupported] [OK, replaced 1.1.2-4vmw.550.1.15.1623387]
   Loading D:\Linux\ESXi5.5u2VIBs\offline_bundles\sata-xahci-1.24-1-offline_bundle.zip ... [OK]
      Add VIB sata-xahci 1.24-1 [OK, added]
   Loading D:\Linux\ESXi5.5u2VIBs\offline_bundles\VMW-ESX-5.5.0-lsiprovider-500.04.V0.53-0003-offline_bundle-2152533.zip ... [OK]
      Add VIB lsiprovider 500.04.V0.53-0003 [OK, added]

Exporting the ImageProfile to 'ESXi-5.5.0-20140902001-standard-customized.iso'. Please be patient
 ...

All done.

Now you have an installation image ready to be tested!

Two new IBM ServeRAID M1015 cards

I found two additional IBM ServeRAID cards on a Swedish forum at a price too good to pass on. These were server pulls and did not have any PCI bracket. I had a box of old computer parts and found two Firewire cards which had one hole that fit the M1015 card. This is good enough and better than paying $10×2 for two brackets on Ebay. As for the cables, my previous experience with Deconn, also on Ebay, was only positive and I ordered 4 cables to fully equip the new cards.

cable

Of course, the first thing I did was to flash the cards to the latest LSI P16 firmware. This time around though, I flashed one card with the IT firmware and omitting the BIOS, and the other with the IR firmware with BIOS. The IT firmware just pass on the disks to the OS while the IR firmware makes it possible to setup RAID 0, 1 or 10 as well as passing on non-RAID disks to the OS. This combination of RAID and pass on disks is something the IBM firmware cannot do.

As soon as I get some decent disks I will see how the card behaves in a Windows computer.

SATA hotswap drive in mdadm RAID array

I needed to replace a SATA drive in a mdadm RAID1 array and I figured I could try to do a hot swap. Before the step-by-step guide, this is how the system is set up for an orientation.

  • 2x1TB physical disks; /dev/sdb and /dev/sdc
  • Each drive contains one single partition; /dev/sdb1 and /dev/sdc1 respectively
  • /dev/sdb1 and /dev/sdc1 together make up the /dev/md0 RAID1 array

Here is what the array looks like:

$ cat /proc/mdstat
Personalities : [linear] [multipath] [raid0] [raid1] [raid6] [raid5] [raid4] [raid10]
md0 : active raid1 sdb1[0] sdc1[1]
976629568 blocks super 1.2 [2/2] [UU]

In the following steps we will remove one drive from the array, remove it physically, add the new physical drive and make mdadm rebuild the array.

Important note!
Since we’re removing one of the drives in a RAID1 set we do not have any redundancy anymore. If this is critical data on the array, this is the time to make a proper backup of it. The drive I’m removing is not faulty in any way and therefor I will not take any backups.

Step-by-step guide

  1. Mark the drive as failed
    $ sudo mdadm --manage /dev/md0 --fail /dev/sdb1
  2. Remove the drive from the array
    $ sudo mdadm --manage /dev/md0 --remove /dev/sdb1
  3. View the mdadm status
    $ cat /proc/mdstat
  4. If you prefer to shut down the system for a cold swap, do it now. Before the hot swap put the drive into standby with the following command
    $ sudo hdparm -Y /dev/sdb
    Make sure you know which drive you are going to remove before issuing this command. Operations to the disk will wake up the drive again.
  5. Remove the SATA signal cable first and then the SATA power cable.
  6. Mount the new drive and connect SATA power. I let the drive spin up for 5-10 seconds before connecting the SATA signal cable. If you did a cold swap, power on the system at this point.
  7. Identify the new drive and what device name it has. In my case, the new drive was conveniently named /dev/sdb, the same as the old one.
  8. Copy the partitioning setup from the other drive in the array to the new disk.
    Make sure the order is correct, otherwise we will erase the operational drive!
    $ sfdisk -d /dev/sdc | sfdisk /dev/sdb
  9. Add the new drive to the RAID array
    $ sudo mdadm --manage /dev/md0 --add /dev/sdb1
  10. The RAID array will now be rebuilt and the progress is indicated by the
    $ cat /proc/mdstat
    output. To have a more dynamic update of the progress use the following:
    $ watch cat /proc/mdstat

When the rebuild is done the status will look something like this again:

$ cat /proc/mdstat
Personalities : [linear] [multipath] [raid0] [raid1] [raid6] [raid5] [raid4] [raid10]
md0 : active raid1 sdb1[2] sdc1[1]
976629568 blocks super 1.2 [2/2] [UU]

Enjoy and be careful with your data!

Cross Flashing of IBM ServeRAID M1015 to LSI SAS9211-8i

Finally, the RAID card and SATA cables have arrived. The card was back ordered from the retailer I decided to buy from. Now they’re in stock though and can be found here: IBM SERVERAID M1015 6GB SAS/SATA

Why on earth did you buy an OEM card?

Please read my post SATA Expansion Card Selection.

I also scored some neat cables from Ebay. Here in Sweden, one SFF-8087 cable in the standard red SATA color would cost 150SEK ($22) if I bought one at the same time as the RAID card (no extra shipping cost). Two cables of the same type but with black sleeves over silver cables including shipping from Singapore, 100SEK ($15). The choice was simple…

In my prestudy for a suitable controller I found that it was possible to flash certain OEM cards with the original manufacturer’s firmware and BIOS to change the behavior of the card. The IBM ServeRAID is equivalent with a LSI SAS9240 card and it can be flashed into a LSI SAS9211-8i.

All information on how to flash the M1015 card into a LSI SAS9211-8i can be found in this excellent article at ServeTheHome. The content and instructions are updated so I am not going to put them here in case some major changes occur.

As it happens, the process of flashing these cards does not work with any motherboard. The sas2flsh tool refused to work in the following two boards (PAL initialization error)

  • Intel DQ77MK (Q77 chipset, socket 1155, tried PCIe 16x slot)
  • Intel DG965RY (G965 chipset, socket 775, tried PCIe 16x slot)

The following board worked for me:

  • Asus P5QPL-AM (G41 chipset, socket 775, PCIe 16x slot)

For more information and experiences of the flash process, visit this LaptopVideo2Go Forum Post

Here are some additional information that might be useful to an interested flasher

The board is up and running in the ESXi host now and I will run some benchmarks to compare the performance difference between a Datastore image, a Raw Device Mapped (RDM) drive and a drive connected to the LSI controller and passed through to the VM.

SATA Expansion Card Selection

In my previous article, The Storage Challenge, I explained my thinking when it comes to storage for the virtual environment. The conclusion was that I need some kind of SATA controller to set up the storage how I want.

 The requirements I have on the controller are as follows

  • Sata III / 6G support
  • Support for 3+TB drives
  • 8 SATA ports
  • RAID 1
  • Drive hotswap

 Let’s break them down.

  • SATA III/6G is not really a needed today as I will start off with only mechanical SATA II/3G drives. However, I might add an SSD drive to the mix later on which would make use of the added bandwidth.
  • 3+TB drives. Once again, I will begin with only 1TB drives but since the main focus of this storage solution is storage and backup I will most likely increase the amount of storage at a later stage.
  • 8 SATA ports. The initial plan is to connect 4 drives to the controller so 8 is pretty much the next step.
  • RAID 1 is not really needed as I plan on beginning with software RAID1. This option is more of an educational decision. RAID 0 or RAID 1 does not require that much from the controllers and they doesn’t get that expensive. Stepping up to RAID 5 or 6 and we’re talking about a completely different price point.
  • Drive hot swap. The goal of this all-in-one machine is that it will always be online. Hence, I would like to be able to add a hot swap HDD bay down the road. I’m also interested in trying how the OS will handle hot swap when the drives are in a software RAID array. Another educational aspect.

With the requirement list set I started searching for a suitable card. Since I run ESXi on the hardware I would like to have native support for it in case I decide to use RAID below ESXi. Looking at the VMware white list for storage adapters (link), the safest bet is to use a card based on an LSI controller. As I have come to understand, many large hardware companies rebrand LSI card to their own brand. These cards happens to be cheaper than LSI’s own cards. ServeTheHome have some excellent articles and summaries on what cards from different manufacturers are based on. Here in Sweden it seems like IBM and their ServeRAID cards are the cheapest with comparable controllers.

 Using the excellent sorting mechanism of Prisjakt.nu boiled it all down to these four cards:

  • IBM ServeRAID BR10i
  • IBM ServeRAID M1015
  • IBM ServeRAID M1115
  • IBM ServeRAID M5110

Here is a great summary on the IBM website regarding the ServeRAID adapters. BR10i is not capable of SATA 6G or 3TB drives so it’s out of the list. M5110 is a nice card capable of RAID5 but is also somewhat 50% more expensive than the M1X15 cards. M1015 seems to be a really popular card to flash to LSI’s own firmwares to enable different operating modes. M1115 seems to be pretty much the same card but I have not yet found any information on flashing it with LSI firmwares. M1015 is slightly cheaper so I decided to go for it.

ServeTheHome also happens to have a pointer to a pretty good deal for people in the United States on a IBM ServeRAID M1015

The Storage Challenge

I’m having some challenges in deciding how to implement my storage. Of course, I could just go to the VMware Whitelist and pick the latest and greatest RAID controller. The same card would cost more than the rest of the system all together and that’s simply not an option. The goal is to get the minimal card to solve my current need and therefor I need to get a good overview of the reasonable solutions.

  1. No RAID what-so-ever
    This method would cost nothing and be quite simple, hardware wise, to implement – Just plug in the drives to the Intel onboard SATA controller. I could create redundancy with some software routines and set up virtual disk images in each datastore. However, if any disk would go down I would have to shut down the entire system and fix the problem.
  2. Pass-through of onboard controller
    This is an interesting alternative. I could pass the entire onboard SATA controller to a single virtual machine. After that I could do software RAID in Linux on some of the drives. However, it’s not possible to just pass a subset of the SATA ports to a VM. It’s all or none ports. Therefor I won’t have any place to put the VM itself. Catch 22…
  3. Hardware RAID
    Intel’s onboard SATA controller is only capable of software RAID which is not supported by ESXi so this alternative needs a competent controller. There are also some options within this alternative.

    • RAID of the entire environment
      The ESXi would only see the storage in whatever way I set up the RAID. This way everything regarding the virtual machines that reside on a redundant drive set would be covered. This is somewhat tempting but I’m not really sure on how to supervise the RAID sets.
    • Pass on the controller to a VM
      Once again, I could pass the entire controller to a VM and then set up RAID at a software level. The positive thing with passing on a separate controller is that I still have the onboard controller to store non important stuff as ISO images and test VMs. Another appealing thing is that the content of the drives would be only the relevant stuff. The OS resides on the datastore connected to the onboard storage and only the important information would be RAIDed.

I have pretty much decided on going with the last option. Perhaps this is one way to illustrate how i intend to solve it:

  • USB Controller
    • USB Drive with the ESXi host
  • Onboard SATA controller
    • 1TB drive with VMs and ISOs
  • PCI-Express SATA controller, passed on to a VM
    • 4x1TB drives setup with software RAID