ESXi 5.5 u2 on ASRock Z97 Extreme6 with dual NIC support

I finally got around trying out the ASRock Z97 Extreme 6 motherboard and how it is supported by ESXi 5.5-u2. There seems to be quite a few issues with getting the Intel I218 to work on some Z97 boards, while the very same driver have been tested to work well on Z87 boards with the Intel I217 controller, for example the ASRock Z87 Extreme 6.

I recently found that a VMWare forum user called GLRoman had managed to compile an updated Intel e1000e driver that is required for this NIC. By the way, I encourage everyone interested in getting drivers to work for ESXi to read through this thread and the threads it’s linking too. Very interesting!

How to add Intel and Realtek drivers to an ESXi 5.5 U2 ISO

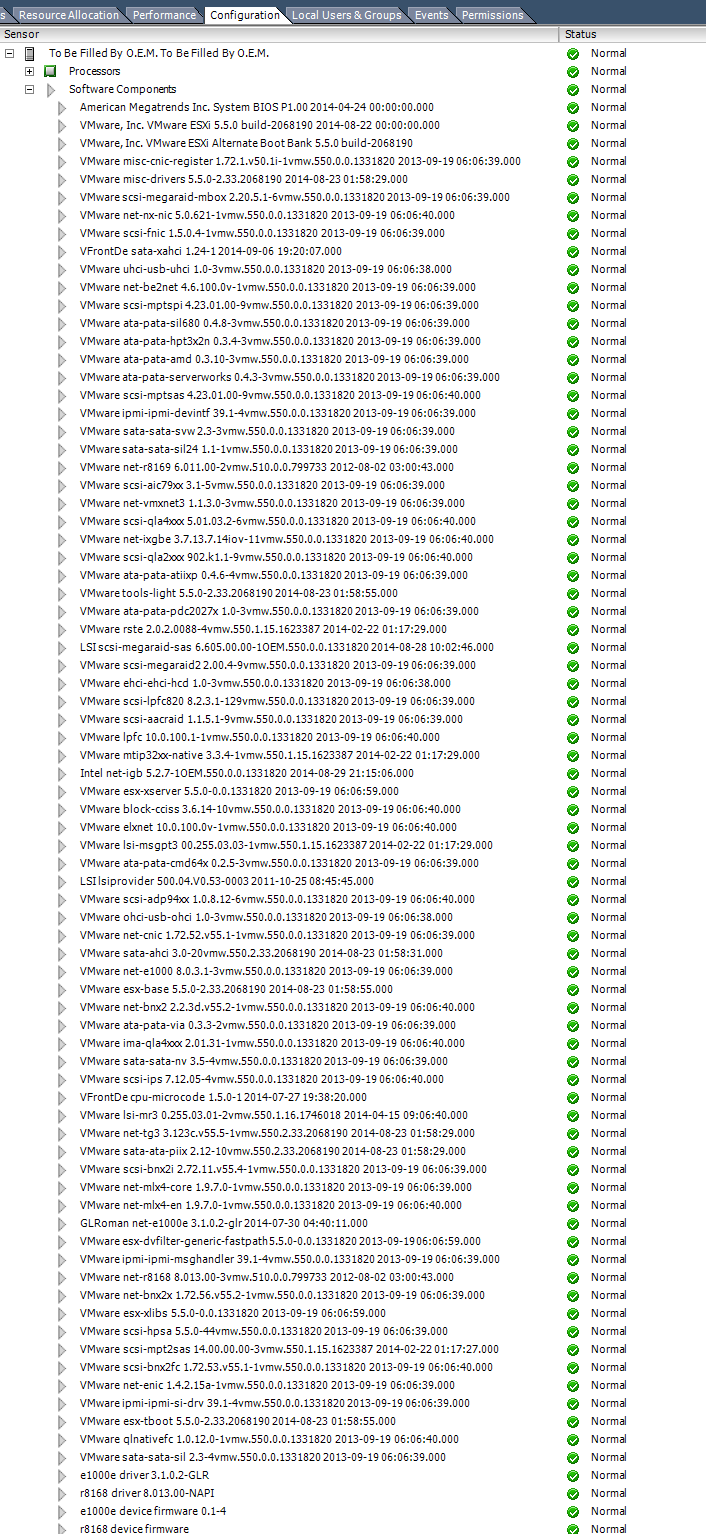
While I was at it I also decided to try to add Realtek drivers to the ESXi 5.5-u2 ISO in an attempt to get both NICs on the Z97 ASRock Extreme6 board to work. Please see my previous blog post on adding the updated Intel driver to an ISO. I used the very same method for this test with the addition of the Realtek drivers. In summary, these are the packages, including links to them, that are required to get both NIC operational.

The Intel driver is an offline bundle while the Realtek driver packages are VIB files. The Realtek VIBs are compressed to a zip file and need to be extracted for the EXSi-Customizer-PS script.

How to make ASRock Z97 Extreme 6 boot ESXi when installed on USB

As I have said earlier, I’m fond of installing ESXi to a USB stick to make it separated from the datastores. From what I have understood, ESXi is using GPT by default and I did not manage to get it to boot with UEFI in that way. I found that it is possible to add an option to the installation process which uses MBR instead of GPT.

During boot of the installation media, press SHIFT + O when promted. A prompt with “runweasel” will appear. Press space and add “formatwithmbr“, press enter to continue the installation as normal.

ESXi support for onboard AHCI SATA controller

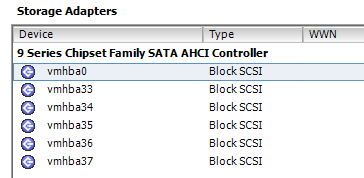
In the previous article I covered the issue of VMWare removing support for some onboard SATA controllers. I did not test whether or not ESXi 5.5 U2 would detect the onboard SATA AHCI controller on this motherboard without the sata-xahci driver package since I decided to include it right away. As can be seen from the screenshot below, the onboard Intel SATA controller is detected and it is possible to connect a HDD/SSD to these ports and use them for datastore. ESXi does not support onboard SATA RAID since it is a kind of software RAID.

sata_ahci

VT-d verification on the ASRock Z97 Extreme 6

Unfortunately, at the time of this test I did not have a VT-d capable CPU installed in the system. Therefore, I can not verify that VT-d is working with this board. From what I have read, it is possible to get VT-d to work on the Z97 chipset and other persons have managed to get it working on similar boards. Hopefully, I will have the chance to confirm this at a later point.

Conclusion

It is possible to make both onboard NICs on ASRock Z97 Extreme 6 available to ESXi 5.5 U2 by adding drivers for them to the ESXi ISO image. It is also possible to use the onboard SATA controller to connect drives and use them as datastores.

extreme6_nics

drivers

Adding multiple drivers to an ESXi 5.5 u2 ISO

The calm before the storm

My VMware ESXi based home server has been working really well for the last 2 years and I have not felt the need to upgrade it. That is the longest I can handle “don’t fix it if it ain’t broken” šŸ˜‰

Background and motivation

The main reason for this upgrade is to move from a solution with a single HDD connected to the onboard SATA controller, to a battery backed hardware RAID controller (LSI 9261-8i). I guess I have been lucky, but let’s not celebrate too early!

Anyway, this article is about preparing a new ESXi ISO with all the drivers needed for the transition from ESXi 5.1 to ESXi 5.5-u2. Although I have not been reading very actively on this topic lately, I do have picked up a few things to consider for this upgrade:

  • VMware have been removing SATA AHCI mappings for some onboard controllers. This might be an issue since I intend to move the existing VMs from the single drive to the RAID:ed disks.
  • ESXi 5.5 u2 have drivers for the LSI 9261-8i card but there are newer ones, I might as well include the latest release.
  • Speaking of the RAID controller, there is also a “SMIS provider” VIB to be able to manage the RAID controller in the host remotely. To be honest, I need to learn more about this and the first step is to include this functionality.
  • Still no native support for one of the Intel NICs on this board (Intel DQ77MK motherboard with Intel 82579LM and 82574L NICs). Therefore, NIC drivers need to be included.
  • Finally, since this motherboard is more than 2 years old, at least since I last updated the BIOS, I’m going to include a CPU microcode update pack.

Preparing to include drivers in an ESXi 5.5-u2 ISO

Previously, I have been using the graphical ESXi-Customizer tool to add drivers to an ISO, but this time I will attempt to use the PowerShell script version

Here is a recipe for the tool chain:

Here is a summary of the drivers to be included.

The ESXi-Customizer-PS has a really nice feature where it is possible to make it load an entire directory with files to be included. I created an offline_bundles subfolder from where I put the ESXi-Customizer-PS script and copied all files to it.

Executing the ESXi-Customizer-PS script

I’m a complete PowerShell noob and it took me a while to just make it run the script. I had to run the following command to allow script:

Set-ExecutionPolicy Unrestricted

Navigate to the ESXi-Customizer script folder and run the following command:

.\ESXi-Customizer-PS-v2.3.ps1 -pkgDir .\offline_bundles -izip .\update-from-esxi5.5-5.5_update02-2068190.zip -nsc

To make it easier to read, here it is again broken into multiple rows:

.\ESXi-Customizer-PS-v2.3.ps1 
-pkgDir .\offline_bundles
-izip .\update-from-esxi5.5-5.5_update02-2068190.zip 
-nsc

A successful output looks something like this:

Script to build a customized ESXi installation ISO or Offline bundle using the VMware PowerCLI ImageBuilder snapin
(Call with -help for instructions)

Running with PowerShell version 2.0 and VMware vSphere PowerCLI 5.8 Release 1 build 2057893

Adding base Offline bundle .\update-from-esxi5.5-5.5_update02-2068190.zip ... [OK]

Getting ImageProfiles, please wait ... [OK]

Using ImageProfile ESXi-5.5.0-20140902001-standard ...
(dated 08/23/2014 06:46:46, AcceptanceLevel: PartnerSupported,
For more information, see http://kb.vmware.com/kb/2079732.)

Loading Offline bundles and VIB files from .\offline_bundles\ ...
   Loading D:\Linux\ESXi5.5u2VIBs\offline_bundles\cpu-microcode-1.5.0-1-offline_bundle.zip ... [OK]
      Add VIB cpu-microcode 1.5.0-1 [OK, added]
   Loading D:\Linux\ESXi5.5u2VIBs\offline_bundles\igb-5.2.7-1331820-offline_bundle-2157967.zip ... [OK]
      Add VIB net-igb 5.2.7-1OEM.550.0.0.1331820 [OK, replaced 5.0.5.1.1-1vmw.550.1.15.1623387]
   Loading D:\Linux\ESXi5.5u2VIBs\offline_bundles\megaraid_sas-6.605.00.00-offline_bundle-2132901.zip ... [OK]
      Add VIB scsi-megaraid-sas 6.605.00.00-1OEM.550.0.0.1331820 [OK, replaced 5.34-9vmw.550.2.33.2068190]
   Loading D:\Linux\ESXi5.5u2VIBs\offline_bundles\net-e1000e-3.1.0.2-glr-offline_bundle.zip ... [OK]
      Add VIB net-e1000e 3.1.0.2-glr [New AcceptanceLevel: CommunitySupported] [OK, replaced 1.1.2-4vmw.550.1.15.1623387]
   Loading D:\Linux\ESXi5.5u2VIBs\offline_bundles\sata-xahci-1.24-1-offline_bundle.zip ... [OK]
      Add VIB sata-xahci 1.24-1 [OK, added]
   Loading D:\Linux\ESXi5.5u2VIBs\offline_bundles\VMW-ESX-5.5.0-lsiprovider-500.04.V0.53-0003-offline_bundle-2152533.zip ... [OK]
      Add VIB lsiprovider 500.04.V0.53-0003 [OK, added]

Exporting the ImageProfile to 'ESXi-5.5.0-20140902001-standard-customized.iso'. Please be patient
 ...

All done.

Now you have an installation image ready to be tested!

How to add Intel NIC drivers to an ESXi 5.5 ISO

Modifying ESXi ISO images to include network drivers

Using new hardware with not-yet supported or unsupported drivers is often required when using consumer grade and/or desktop components. Most of the motherboards I have presented here on this blog (ASRock Z87 Extreme6, ASRock Z77 Pro4-M, Intel DQ77KB, Intel DQ77MK) have had unsupported network controllers.

There are ways to add support for a NIC after ESXi has been installed. However, to install ESXi from the beginning requires at least one supported network controller. Adding or updating a driver directly in the ESXi ISO solves this issue.

Tools required

To be able to perform the driver inclusion the following tools are needed:

When it comes to what driver to include I have to be honest to report that I have not been able to fully figure it out. Intel seems to have two lines of drivers for Linux, igb and e1000. from what I understand, the igb drivers are mostly for server NICs and the e1000 drivers for desktop NICs. Some desktop controllers use the igb driver though. Here is an excerpt from Intel’s website:

e1000e.x.x.x.tar.gz is designed to work with the IntelĀ® 82563/6/7 Gigabit Ethernet PHY, 82571/2/3/4/7/8/9,Ā 82583 Gigabit Ethernet Controller, and I217/I218Ā controllers under Linux*.Ā  The latest version and earlier versions of this driver are available from SourceForge.

If your adapter/connection is notĀ 82563, 82566, 82567, 82571, 82572, 82573, 82574, 82577,Ā 82578, 82579,Ā 82583 -based, you should use one of the following drivers:

– igb-x.x.x.tar.gz driver supports all IntelĀ® 82575/6-, 82580-, I350-, or I210/1-based Gigabit Network Adapters/Connections.
– e1000-x.x.x.tar.gz driver supports all IntelĀ® 8254x-based PCI and PCI-X Gigabit Network Adapters/Connections.

Furthermore, the drivers for ESXi needs to be recompiled from the above versions. TheĀ ASRock Z87 Extreme6 board, that will be used in this example, have the following two controllers:

  • IntelĀ® Ethernet Connection I217-V, e1000e driver.
  • IntelĀ® Ethernet Controller I211 Series, igb driver.

I will only demonstrate how to get the e1000e driver to work, simply because I have not yet found a newly compiled version of the igb driver. The newest e1000e driver I can find on the Internet is:

http://shell.peach.ne.jp/~aoyama/wordpress/download/net-e1000e-2.3.2.x86_64.vib

Credit goes to the following site:http://shell.peach.ne.jp/aoyama/archives/2907

Using the ESXi-Customizer

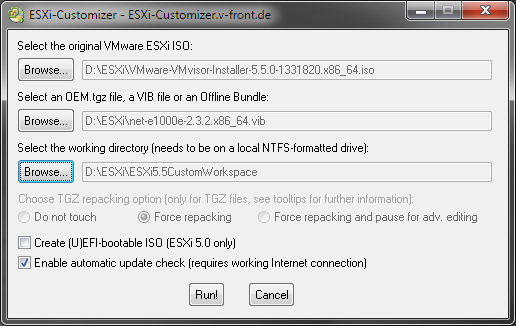
Here is how I set up the ESXi-Customizer

  1. Start the ESXi-Customizer
  2. Load the ESXi 5.5 ISO
  3. Load the net-e1000e-2.3.2.x86_64.vib driver package
  4. Uncheck UEFI bootable. (I have read both suggestions both for and against. Unchecked has worked well for me)
  5. Hit Run! to create the new ISO
  6. Burn the ISO to a disc or make a bootable USB out of it.

This is what the ESXi-Customizer looks like for me.

ESXi-Customizer

I hope everything works out. Either way, let me know in the comments below!

Installing ESXi 5.1 to a USB drive

I do not have any plans to install an optical drive in this server but I still need to install ESXi from an ISO image to a USB drive. This is one way to do it:

  1. Fire up your favorite virtual environment that can handle the following requirements
    • Assign 2 processor cores to a VM
    • Assign 3GB of virtual RAM to the VM
    • Assign an ESXi supported network controller to the VM
    • Enable hardware virtualization to the VM

    Here are some screen shots from VirtualBox running under Ubuntu 12.04:


    Load the ESXi ISO image to the virtual CD drive

    An overview of all settings

  2. Insert the target USB drive into the host
  3. Launch the VM and press a key to halt the ESXi installer at the following screen

    Right click in the USB icon next to the CDROM icon and select the USB drive.
  4. Finalize the ESXi installation and shutdown the virtual machine.
  5. Move the USB drive to the physical machine and verify that it boots.
    Note: The physical machine must be able to boot off a drive with a GPT. Look for a UEFI Boot settings in BIOS.