Manage an LSI MegaRAID card in ESXi host remotely with MSM

Here is a quick post on how to remotely manage an LSI MegaRAID card in an ESXi host with MegaRAID Storage Manager, aka MSM.

Setup

  • ESXi 5.5 u2 host
  • LSI MegaRAID SAS 9261-8i (this guide will work on most 926x and 927x cards)
  • Windows 7 SP1 physical client

Required software

How to get it working

I have read multiple guides on doing this very simple thing. However, most of the tricks did not work or was not an issue for me. Here is what was needed for me to get it working with this setup.

  1. Make sure the LSI SMIS provider is working. Do you get health indications from the RAID card in vSphere? Installed software components. If not; stop here, install it and make sure it is working.
  2. Enable SSH on the host and connect to the host over SSH
  3. View the hosts file with cat /etc/hosts
  4. Copy the line with the IP address to the server, for example:
    172.17.1.1  hostname.domain hostname
  5. On the client Windows machine, edit the hosts file* and add a row for each hostname found in step 4, for example:
    172.17.1.1  hostname.domain
    172.17.1.1  hostname
  6. Start LSI MSM from the client. Change the search setting to ESXIMON servers, save, and then enter the IP of the local machine (not the host IP) in the search field.MegaRAID_storage_manager_host_configuration
  7. Hit search and the host should appear with the correct hostname and IP.MSM-search-results

(*) Right click on a link to Notepad (or a custom text editor) and choose Run as administrator. Select File – Open, and enter the following file name:

C:\Windows\System32\drivers\etc\hosts

I hope this helps the RAID administration! Let me know if you succeed or not in the comments.

ESXi 5.5 u2 on ASRock Z97 Extreme6 with dual NIC support

I finally got around trying out the ASRock Z97 Extreme 6 motherboard and how it is supported by ESXi 5.5-u2. There seems to be quite a few issues with getting the Intel I218 to work on some Z97 boards, while the very same driver have been tested to work well on Z87 boards with the Intel I217 controller, for example the ASRock Z87 Extreme 6.

I recently found that a VMWare forum user called GLRoman had managed to compile an updated Intel e1000e driver that is required for this NIC. By the way, I encourage everyone interested in getting drivers to work for ESXi to read through this thread and the threads it’s linking too. Very interesting!

How to add Intel and Realtek drivers to an ESXi 5.5 U2 ISO

While I was at it I also decided to try to add Realtek drivers to the ESXi 5.5-u2 ISO in an attempt to get both NICs on the Z97 ASRock Extreme6 board to work. Please see my previous blog post on adding the updated Intel driver to an ISO. I used the very same method for this test with the addition of the Realtek drivers. In summary, these are the packages, including links to them, that are required to get both NIC operational.

The Intel driver is an offline bundle while the Realtek driver packages are VIB files. The Realtek VIBs are compressed to a zip file and need to be extracted for the EXSi-Customizer-PS script.

How to make ASRock Z97 Extreme 6 boot ESXi when installed on USB

As I have said earlier, I’m fond of installing ESXi to a USB stick to make it separated from the datastores. From what I have understood, ESXi is using GPT by default and I did not manage to get it to boot with UEFI in that way. I found that it is possible to add an option to the installation process which uses MBR instead of GPT.

During boot of the installation media, press SHIFT + O when promted. A prompt with “runweasel” will appear. Press space and add “formatwithmbr“, press enter to continue the installation as normal.

ESXi support for onboard AHCI SATA controller

In the previous article I covered the issue of VMWare removing support for some onboard SATA controllers. I did not test whether or not ESXi 5.5 U2 would detect the onboard SATA AHCI controller on this motherboard without the sata-xahci driver package since I decided to include it right away. As can be seen from the screenshot below, the onboard Intel SATA controller is detected and it is possible to connect a HDD/SSD to these ports and use them for datastore. ESXi does not support onboard SATA RAID since it is a kind of software RAID.

sata_ahci

VT-d verification on the ASRock Z97 Extreme 6

Unfortunately, at the time of this test I did not have a VT-d capable CPU installed in the system. Therefore, I can not verify that VT-d is working with this board. From what I have read, it is possible to get VT-d to work on the Z97 chipset and other persons have managed to get it working on similar boards. Hopefully, I will have the chance to confirm this at a later point.

Conclusion

It is possible to make both onboard NICs on ASRock Z97 Extreme 6 available to ESXi 5.5 U2 by adding drivers for them to the ESXi ISO image. It is also possible to use the onboard SATA controller to connect drives and use them as datastores.

extreme6_nics

drivers

Adding multiple drivers to an ESXi 5.5 u2 ISO

The calm before the storm

My VMware ESXi based home server has been working really well for the last 2 years and I have not felt the need to upgrade it. That is the longest I can handle “don’t fix it if it ain’t broken” 😉

Background and motivation

The main reason for this upgrade is to move from a solution with a single HDD connected to the onboard SATA controller, to a battery backed hardware RAID controller (LSI 9261-8i). I guess I have been lucky, but let’s not celebrate too early!

Anyway, this article is about preparing a new ESXi ISO with all the drivers needed for the transition from ESXi 5.1 to ESXi 5.5-u2. Although I have not been reading very actively on this topic lately, I do have picked up a few things to consider for this upgrade:

  • VMware have been removing SATA AHCI mappings for some onboard controllers. This might be an issue since I intend to move the existing VMs from the single drive to the RAID:ed disks.
  • ESXi 5.5 u2 have drivers for the LSI 9261-8i card but there are newer ones, I might as well include the latest release.
  • Speaking of the RAID controller, there is also a “SMIS provider” VIB to be able to manage the RAID controller in the host remotely. To be honest, I need to learn more about this and the first step is to include this functionality.
  • Still no native support for one of the Intel NICs on this board (Intel DQ77MK motherboard with Intel 82579LM and 82574L NICs). Therefore, NIC drivers need to be included.
  • Finally, since this motherboard is more than 2 years old, at least since I last updated the BIOS, I’m going to include a CPU microcode update pack.

Preparing to include drivers in an ESXi 5.5-u2 ISO

Previously, I have been using the graphical ESXi-Customizer tool to add drivers to an ISO, but this time I will attempt to use the PowerShell script version

Here is a recipe for the tool chain:

Here is a summary of the drivers to be included.

The ESXi-Customizer-PS has a really nice feature where it is possible to make it load an entire directory with files to be included. I created an offline_bundles subfolder from where I put the ESXi-Customizer-PS script and copied all files to it.

Executing the ESXi-Customizer-PS script

I’m a complete PowerShell noob and it took me a while to just make it run the script. I had to run the following command to allow script:

Set-ExecutionPolicy Unrestricted

Navigate to the ESXi-Customizer script folder and run the following command:

.\ESXi-Customizer-PS-v2.3.ps1 -pkgDir .\offline_bundles -izip .\update-from-esxi5.5-5.5_update02-2068190.zip -nsc

To make it easier to read, here it is again broken into multiple rows:

.\ESXi-Customizer-PS-v2.3.ps1 
-pkgDir .\offline_bundles
-izip .\update-from-esxi5.5-5.5_update02-2068190.zip 
-nsc

A successful output looks something like this:

Script to build a customized ESXi installation ISO or Offline bundle using the VMware PowerCLI ImageBuilder snapin
(Call with -help for instructions)

Running with PowerShell version 2.0 and VMware vSphere PowerCLI 5.8 Release 1 build 2057893

Adding base Offline bundle .\update-from-esxi5.5-5.5_update02-2068190.zip ... [OK]

Getting ImageProfiles, please wait ... [OK]

Using ImageProfile ESXi-5.5.0-20140902001-standard ...
(dated 08/23/2014 06:46:46, AcceptanceLevel: PartnerSupported,
For more information, see http://kb.vmware.com/kb/2079732.)

Loading Offline bundles and VIB files from .\offline_bundles\ ...
   Loading D:\Linux\ESXi5.5u2VIBs\offline_bundles\cpu-microcode-1.5.0-1-offline_bundle.zip ... [OK]
      Add VIB cpu-microcode 1.5.0-1 [OK, added]
   Loading D:\Linux\ESXi5.5u2VIBs\offline_bundles\igb-5.2.7-1331820-offline_bundle-2157967.zip ... [OK]
      Add VIB net-igb 5.2.7-1OEM.550.0.0.1331820 [OK, replaced 5.0.5.1.1-1vmw.550.1.15.1623387]
   Loading D:\Linux\ESXi5.5u2VIBs\offline_bundles\megaraid_sas-6.605.00.00-offline_bundle-2132901.zip ... [OK]
      Add VIB scsi-megaraid-sas 6.605.00.00-1OEM.550.0.0.1331820 [OK, replaced 5.34-9vmw.550.2.33.2068190]
   Loading D:\Linux\ESXi5.5u2VIBs\offline_bundles\net-e1000e-3.1.0.2-glr-offline_bundle.zip ... [OK]
      Add VIB net-e1000e 3.1.0.2-glr [New AcceptanceLevel: CommunitySupported] [OK, replaced 1.1.2-4vmw.550.1.15.1623387]
   Loading D:\Linux\ESXi5.5u2VIBs\offline_bundles\sata-xahci-1.24-1-offline_bundle.zip ... [OK]
      Add VIB sata-xahci 1.24-1 [OK, added]
   Loading D:\Linux\ESXi5.5u2VIBs\offline_bundles\VMW-ESX-5.5.0-lsiprovider-500.04.V0.53-0003-offline_bundle-2152533.zip ... [OK]
      Add VIB lsiprovider 500.04.V0.53-0003 [OK, added]

Exporting the ImageProfile to 'ESXi-5.5.0-20140902001-standard-customized.iso'. Please be patient
 ...

All done.

Now you have an installation image ready to be tested!

How to add Intel NIC drivers to an ESXi 5.5 ISO

Modifying ESXi ISO images to include network drivers

Using new hardware with not-yet supported or unsupported drivers is often required when using consumer grade and/or desktop components. Most of the motherboards I have presented here on this blog (ASRock Z87 Extreme6, ASRock Z77 Pro4-M, Intel DQ77KB, Intel DQ77MK) have had unsupported network controllers.

There are ways to add support for a NIC after ESXi has been installed. However, to install ESXi from the beginning requires at least one supported network controller. Adding or updating a driver directly in the ESXi ISO solves this issue.

Tools required

To be able to perform the driver inclusion the following tools are needed:

When it comes to what driver to include I have to be honest to report that I have not been able to fully figure it out. Intel seems to have two lines of drivers for Linux, igb and e1000. from what I understand, the igb drivers are mostly for server NICs and the e1000 drivers for desktop NICs. Some desktop controllers use the igb driver though. Here is an excerpt from Intel’s website:

e1000e.x.x.x.tar.gz is designed to work with the Intel® 82563/6/7 Gigabit Ethernet PHY, 82571/2/3/4/7/8/9, 82583 Gigabit Ethernet Controller, and I217/I218 controllers under Linux*.  The latest version and earlier versions of this driver are available from SourceForge.

If your adapter/connection is not 82563, 82566, 82567, 82571, 82572, 82573, 82574, 82577, 82578, 82579, 82583 -based, you should use one of the following drivers:

– igb-x.x.x.tar.gz driver supports all Intel® 82575/6-, 82580-, I350-, or I210/1-based Gigabit Network Adapters/Connections.
– e1000-x.x.x.tar.gz driver supports all Intel® 8254x-based PCI and PCI-X Gigabit Network Adapters/Connections.

Furthermore, the drivers for ESXi needs to be recompiled from the above versions. The ASRock Z87 Extreme6 board, that will be used in this example, have the following two controllers:

  • Intel® Ethernet Connection I217-V, e1000e driver.
  • Intel® Ethernet Controller I211 Series, igb driver.

I will only demonstrate how to get the e1000e driver to work, simply because I have not yet found a newly compiled version of the igb driver. The newest e1000e driver I can find on the Internet is:

http://shell.peach.ne.jp/~aoyama/wordpress/download/net-e1000e-2.3.2.x86_64.vib

Credit goes to the following site:http://shell.peach.ne.jp/aoyama/archives/2907

Using the ESXi-Customizer

Here is how I set up the ESXi-Customizer

  1. Start the ESXi-Customizer
  2. Load the ESXi 5.5 ISO
  3. Load the net-e1000e-2.3.2.x86_64.vib driver package
  4. Uncheck UEFI bootable. (I have read both suggestions both for and against. Unchecked has worked well for me)
  5. Hit Run! to create the new ISO
  6. Burn the ISO to a disc or make a bootable USB out of it.

This is what the ESXi-Customizer looks like for me.

ESXi-Customizer

I hope everything works out. Either way, let me know in the comments below!

VT-d Verification on ASRock Z87 Extreme6 with ESXi 5.5

This is one of the best enthusiast ESXi virtualization motherboard I have come across so far: ASRock Z87 Extreme6 (maybe second to ASRock Z77 Extreme11).
Some of the highlights:

  • Onboard USB header
  • VT-d passthrough
  • Debug LED
  • Dual Intel NICs

I’m very fond of installing ESXi on a USB stick to separate it from the rest of the storage. Previously I have removed the metal bracket from “onboard-USB-header-to-rear-I/O-bracket” (whatever do they call these things?) that used to come along with motherboards a couple of years back, to have an internal USB header.

Secondly, ASRock is one of the few manufacturers that supports VT-d on as many of their motherboards as possible. Even on boards with a chipset not officially supporting VT-d, like the Z77. Here is my previous test of ASRock Z77 Pro4-M. See below for some VT-d tests.

Finally, the debug code LED. This brings some lovely overclocking memories back to life. One of the main reasons for choosing Abit over Asus back in the P3 and P4 days was this very tiny feature. The POST codes proved to be extremely valuable when pushing the very last bit of performance out of a system. Anyway, I’m way off track. Let’s look at some pictures and some of my other findings.

Extreme6-overview USB-header-post-code-led intel-i211 sata-ports

Specifications

  • Intel Z87 chipset
  • Intel Haswell CPU support, socket 1150
  • Four DIMMS, supporting 32GB RAM
  • Dual Intel Gigabit LAN (I217V + I211AT)
  • USB socket directly on the board
  • POST debug code display
  • 8x USB3

The dual Intel network controllers is a real positive thing for us ESXi persons and I was really exited about this. But, neither of these controllers are supported by ESXi 5.5 out of the box. The I217 NIC can be made to work if a newer driver is supplied. However, the I211 NIC is a scaled down desktop version, as far as I have read and I have not yet found a way to make work.

Apart from the Z87 based SATA controller, there are also four additional ports connected to two controllers made by ASMedia. Two ports to each controller, whereas one port double as a ESATA port. The name of the controllers are “ASM1062”.

In total, there are eight USB3 ports where four are connected to the Z87 chipset and four connected to a controller also made by ASMedia. The four rear I/O ones are connected to the ASMedia controller and the four internal ones to the Z87 chipset. I am not entirely sure if I think this was the best move by ASRock. I can argue either way.

VT-d testing

While gathering fact about the board on the Internet I came across some comments fearing the removal of the VT-d setting for some boards and with some BIOS versions. This board, with the shipping BIOS (P2.10), has the VT-d option. According to some BIOS release notes, even though the VT-d option is removed it is supposed to be enabled by default if all criterias are met.

ESXi 5.5 is capable of utilizing the VT-d functionality with this board. More specifically DirectPath I/O as VMware calls it. Here are some of my findings:

  • Both NICs can be passed on to a VM, even though none of them are supported out of the box by ESXi 5.5, and only one can be made operational with additional drivers.
  • Both ASMedia SATA controllers show up and can be passed on to a VM. However, when I tried this with a Ubuntu 13.10 VM I could not get any drive connected to show up. The controller is detected in the VM but that is all. The controller is detected by Ubuntu 13.10 when run natively.
  • The ASMedia USB3 controller does not show up in the passthrough view. There are two Z87 USB controllers showing up but it is not clear to me if either or both of them are USB3.
  • An LSI 9211-8i card, actually a flashed M1015, inserted into the top most PCI-Express 16x slot did not show up as available for passthrough. The card works in this port when running Ubuntu 13.10 natively. Inserting the card in the second slot made it available for passthrough and it worked well with Ubuntu 13.10.

Here is a screenshot of the default available passthrough devices:

ESXi-ASRockZ87Extreme6

Summary

All in all, a board with great potential. If drivers arrive for the second Intel NIC and some of the passthrough issues are sorted out it will be a killer motherboard. Nothing critical by any means, but the flexibility is reduced if you need to use one PCI(-Express) slot for another NIC, all SATA ports or an separate RAID controller.

I will hopefully be able to present upcoming articles on how to customize an ESXi image for this board and present some storage benchmarks.

*Update 2014-01-04*
Here is how to include a driver the one of the Intel network controllers on this board:
Include Intel network drivers in an ESXi ISO
Also, here is some storage benchmarks related to this board:
Storage performance of ASRock Z87 Extreme6

Cloning a virtual hard disk to a new ESXi datastore

One physical drive of my ESXi host is starting to act strange and after a couple of years I think it is a good idea to start migrating to a new drive. Unfortunately, I do not do this often enough to remember the process. Therefor, I intend to document it here and it could hopefully be of help to someone else.

Precondition

  • ESXi 5.1
  • Ubuntu Server 12.04 virtual machine on “Datastore A”
  • VM hard disk is thin provisioned

Goal

  • Move the VM to “Datastore B”
  • Reduce the used space of the VM on the new datastore

The VM was set up with a 1TB thin provisioned drive and the initial usage was up to 400GB. Later on I moved the majority of the used storage to a separate VM and the usage now is around 35GB. However, the previously used storage is not freed up and I intend to accomplish this by cloning the VM to a new virtual disk. As far as I know, there are other methods to free up space but I have not tried any of those yet. To be investigated…

Process

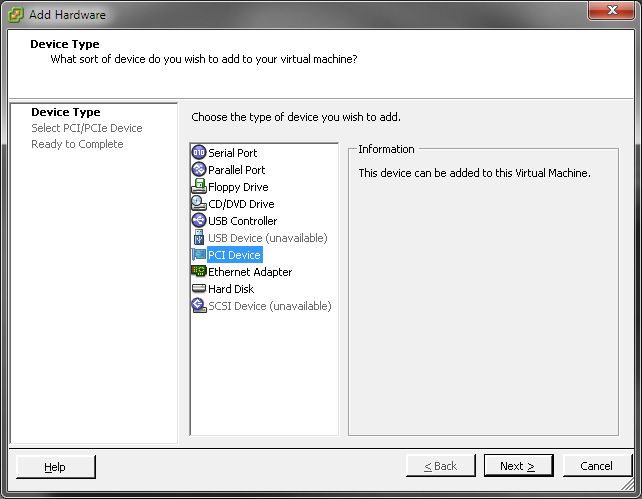
  1. Add new thin virtual hard disk to the VM of the same size on the new datastore
  2. Boot the VM to a cloning tool (I have used Acronis, but there are other free competent alternatives)
  3. Clone the old drive to the new one keeping the same partition setup
  4. Shut down the VM and copy the .vmx-file to the same folder as the .vmdk on the new datastore (created in step 1)
  5. Remove the VM from the inventory. Do not delete the files from the datastore
  6. Browse the new datastore, right click on the copied .vmx-file and select Add to inventory
  7. Edit the settings of the VM to remove the old virtual drive.
  8. Select a Ubuntu Live CD image (preferable the same version as the VM) for the virtual CD drive.
  9. Start the VM. vSphere will pop up a dialogue asking if the VM was moved or copied, select moved.
  10. Boot the VM to a Ubuntu Live CD to fix the mounting and grub
  11. Boot into the new VM

Let’s explain some steps in greater detail.

4. Copy the VMX file

If this is the initial state:

DatastoreA/VM/VM.vmdk
DatastoreA/VM/VM.vmx

After adding a second drive, VM_B.vmdk, on the other datastore (step 1), cloning VM.vmdk to VM_B.vmdk (step 3) and copying the VM.vmx to the VM-folder on datastoreB (step 4), the layout would be the following:

DatastoreA/VM/VM.vmdk
DatastoreA/VM/VM.vmx

DatastoreB/VM/VM_B.vmdk
DatastoreA/VM/VM.vmx

10. Boot the VM to a Ubuntu Live CD to fix mounts and grub

This section is heavily dependent on the guest OS. Ubuntu 12.04 uses UUID’s to mount drives and to decide which drive to boot from. The new virtual drive will have a different UUID than the original drive and will therefor not be able to boot the OS. This is where the Live CD comes in.

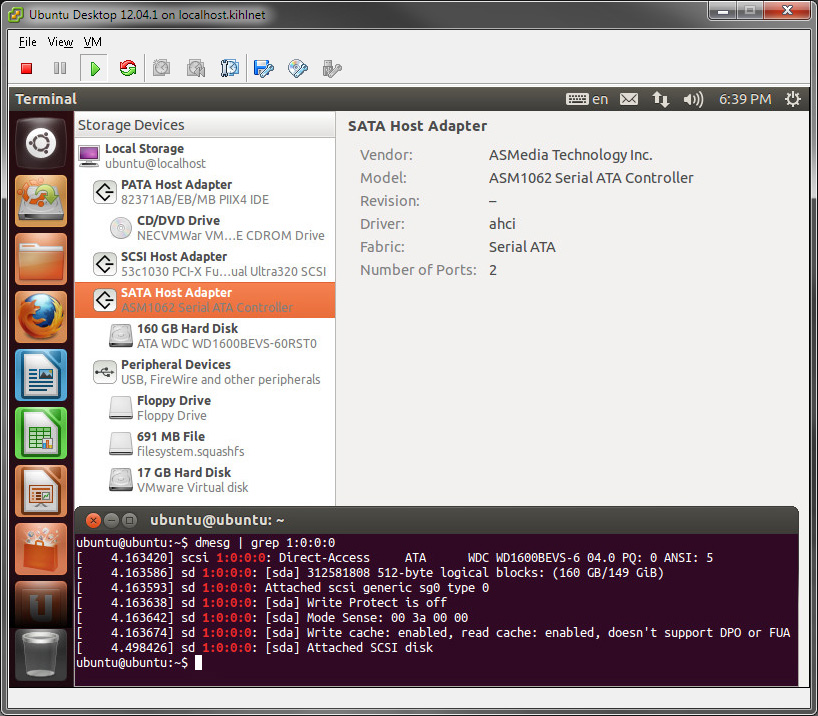
Once inside the Live CD, launch a terminal and orientate yourself. To identify the UUIDs of the partition use:

$ ll /dev/disk/by-uuid/

5de1...9831 -> ../../sda1
f038...185d -> ../../sda2

Next, let’s mount the drive:

$ sudo mount /dev/sdXY /mnt

where X is the drive letter and Y is the root partition.(If you have some exclusive partitioning setup you might need to mount the other partitions to be able to follow these steps. But then again, you probably know what you are doing anyway)

Change the UUID in fstab:
$ sudo nano /mnt/etc/fstab
Look for the following lines and change the old UUIDs to the new ones.

# / was on /dev/sda2 during installation
UUID=f038...158d / ext4 discard,errors=remount-ro 0 1

# swap was on /dev/sda1 during installation
UUID=5de1...5831 none swap sw 0 0

Next up is changing the grub device mapping. The following steps have I borrowed from HowToUbuntu.org (How to repair, restore of reinstall Grub).

$ sudo mount --bind /dev /mnt/dev
$ sudo mount --bind /dev/pts /mnt/dev/pts
$ sudo mount --bind /proc /mnt/proc
$ sudo mount --bind /sys /mnt/sys
$ sudo chroot /mnt

With the help of chroot, the grub tools will operate on the virtual drive rather than the live OS. Run the following commands to re-/install the boot loader again.

# grub-install /dev/sda
# grub-install --recheck /dev/sda
# update-grub

Lets exit the chroot and unmount the directories:

# exit
$ sudo umount /mnt/dev/pts
$ sudo umount /mnt/dev
$ sudo umount /mnt/proc
$ sudo umount /mnt/sys
$ sudo umount /mnt

Now we should be all set. Shut down the VM, remove the virtual Live CD and boot up the new VM.

VT-d Verification on ASRock Z77 Pro4-M

Strike while the iron is hot

I’m building a workstation for a friend and he chose a ASRock Z77 Pro4-M motherboard. I have had all the parts for a week and it wasn’t until today it struck me that there are some Z77 motherboards that support VT-d. There have been some conflicting information on whether or not VT-d is supported in the Z77 chipset. According to the latest information at the Intel site, VT-d is supported on Z77. However, many motherboard manufacturers have not implemented it (yet?).

Since I had the chance to test this myself I decided to try it out while I had the chance. The specifications of the workstation are as follows:

  • Motherboard: ASRock Z77 Pro4-M (specifications)
  • Processor: Intel Core i7 3770K
  • Memory: Corsair XMS 2x8GB
  • Storage: Intel SSD 520 240GB
  • PSU: beQuiet Straight Power 400W 80+ Gold
  • Case: Fractal Design Define Mini

Now you’re thinking; “this won’t turn out well with a K-processor”… Absolutely right, the Core i7 3770K does not support VT-d. After asking around I happened to find a Core i5 2400 for this test. As you can see on the Intel Ark page, VT-d is supported for that model.

Here are some shots of the ASRock mobo which is really good looking in my opinion.

pci_express

socket_area

io_ports

Let’s hook it up and see if we can get some DirectPath I/O device passthrough going.

There are two settings for virtualization in the BIOS. One (VT-x) is found under CPU configuration and the other (VT-d) is found under Northbridge configuration. ESXi 5.1 installs just fine to a USB stick and detects the onboard NIC, which by the way is a Realtek 8168. An Intel NIC would have been preferred. Once ESXi is installed we can connect to it with the vSphere client and see that we can enable DirectPath.

directpathIO

Unfortunately, I didn’t have any other PCI-Express card available to make a more extensive test. The device I have selected, which vSphere fails to detect, is the ASMedia SATA controller. This controller is used for one internal SATA port and either one internal or the E-SATA port on the back I/O panel.

Create a Virtual Machine, change all settings for it and save the changes. Launch the settings again and Add the PCI device:

add_PCI

add_PCI_choose

Once the PCI device is connected, some settings are not possible to change anymore. It is possible to remove the PCI device, change the settings and re-add the PCI device. Also, adding the PCI device and changing settings at the same time might throw some error messages.

I choose to fire up an Ubuntu 12.04 Live CD just to see if it works. Here is what the controller looks like. I hooked up an old spare drive to the ASMedia controller and as we can see it is correctly detected.

asm_controller

This was a really quick test but I will definitely give ASRock boards another try for upcoming build. Please, ASRock, send me your Z77 Extreme11 board for evaluation. Z77 with LSI onboard SATA is a real killer!

To summarize my short experience with this board:

  • VT-d on Z77 is working!
  • non-K CPU overclocking
  • 3x PCI-Express 16x ports for add in cards.
  • Power ON-to-boot is really quick
  • Realtek NIC is a slight negative. Intel would have been better.

VMware vSphere client over a SSH tunnel

Reaching a virtual host remotely with the vSphere client through a SSH tunnel is not as straight forward as one could hope. However, it is possible with a few simple steps.

How to connect to a remote ESXi server through a SSH tunnel

I will present two examples, one using the Putty GUI and the other with command line arguments for Putty.

A. Putty GUI

  1. Create or open an existing session to a machine located on the ESXi management network.
  2. Go to Connection – SSH – Tunnels and add the following tunnel configurations:

    Replace 10.0.0.254 with the IP of your ESXi host.
  3. Return to the session settings and make sure you save your settings . It is always a pain to realize when pressing Open to early.
  4. Connect to the machine with the newly created session
  5. Due to some issues in the vSphere client we need to add an entry to the Windows hosts file. Open notepad with administrator privileges (needed to make changes to the hosts file) and open the file (without file extension):
    C:\Windows\System32\drivers\etc\hosts
    (hint: copy paste the about line into the Open file dialogue)
  6. Add a line at the end of the file
    127.0.0.1 esxiserver
    Save the file and exit Notepad
  7. Fire the vSphere client and enter esxiserver as “IP address / Name” and your login credentials.

B. Putty command line

  1. Instead of setting up a Putty session with the GUI
    putty.exe -L 443:destIP:443 -L 902:destIP:902 -L 903:destIP:903 user@local_machine
    (all the above on the same line) where destIP is the IP of the ESXi-server, user is your username on the local_machine and local_machine is the machine on the local network. Hit enter to launch the SSH session and log in.
  2. Setup the hosts file as described in step 5-6 in the previous section
  3. Launch the vSphere client and connect as described in step 7 above.

Raw Device Mappings in ESXi 5.1

Raw Device Mapping (RDM) is a a method to pass a physical drive (that is detected by ESXi) to a virtual machine without first creating a Datastore and a virtual hard disk inside it.

Here is how to setup a drive with RDM to a VM:

  1. Enable SSH on the host. Log in to the physical ESXi host. Under Troubleshooting Options select Enable SSH.
  2. Log in to the host with your favorite SSH client
  3. Find out what the disk is called by issuing the command:
    ls -l /vmfs/devices/disks/
    The device is called something like:
    t10.ATA_____SAMSUNG_HD103SJ___________S246JDWS90XXXX______
    Make sure you determine the correct drive to use for the RDM. Entries with the same beginning as above but ending with :1 is a partition. This is not what you want, you want to map the entire drive.
  4. Find your datastore by issuing the command:
    ls -l /vmfs/volumes/

    It should be named something like:
    Datastore1 -> 509159-bd99-…
  5. Go to your Datastore by issuing the command:
    cd /vmfs/volumes/
    Datastore1
    (Type ls and you will see the content of this Datastore)
  6. Here comes the actual mapping. Issue the command:
    vmkfstools -z /vmfs/devices/disks/<name of disk from step 3> <RDM>.vmdk
    Where you replace the <name of disk from step 3> with the actual disk name and <RDM>with what you would like to call the RDM. A concrete example:vmkfstools -z /vmfs/devices/disks/t10.ATA_DISKNAME_ SamsungRDM.vmdk
  7. Log in to the vSphere client
  8. Shutdown the virtual machine that you want to add the RDM to
  9. Open the settings for the virtual machine
  10. Under hardware tab, click Add…
  11. Select Hard Disk and press Next
  12. Select Use an existing virutal disk
  13. Press Browse, go to the datastore we found in step 4 and select theSamsungRDM.vmdk we created in step 6.
  14. Press Next, Next and Finish to finalize the add hardware guide.

The hard drive is now added to the VM. Just start it up and start using the drive.

Note 1: I was trying to be a smart ass by using the path /dev/disks/ instead of /vmfs/devices/disks/ to point out the disk for the vmkfstools and it refused to accept it.

Note 2: SMART monitoring does not work on drives used as RDM.

Cross Flashing of IBM ServeRAID M1015 to LSI SAS9211-8i

Finally, the RAID card and SATA cables have arrived. The card was back ordered from the retailer I decided to buy from. Now they’re in stock though and can be found here: IBM SERVERAID M1015 6GB SAS/SATA

Why on earth did you buy an OEM card?

Please read my post SATA Expansion Card Selection.

I also scored some neat cables from Ebay. Here in Sweden, one SFF-8087 cable in the standard red SATA color would cost 150SEK ($22) if I bought one at the same time as the RAID card (no extra shipping cost). Two cables of the same type but with black sleeves over silver cables including shipping from Singapore, 100SEK ($15). The choice was simple…

In my prestudy for a suitable controller I found that it was possible to flash certain OEM cards with the original manufacturer’s firmware and BIOS to change the behavior of the card. The IBM ServeRAID is equivalent with a LSI SAS9240 card and it can be flashed into a LSI SAS9211-8i.

All information on how to flash the M1015 card into a LSI SAS9211-8i can be found in this excellent article at ServeTheHome. The content and instructions are updated so I am not going to put them here in case some major changes occur.

As it happens, the process of flashing these cards does not work with any motherboard. The sas2flsh tool refused to work in the following two boards (PAL initialization error)

  • Intel DQ77MK (Q77 chipset, socket 1155, tried PCIe 16x slot)
  • Intel DG965RY (G965 chipset, socket 775, tried PCIe 16x slot)

The following board worked for me:

  • Asus P5QPL-AM (G41 chipset, socket 775, PCIe 16x slot)

For more information and experiences of the flash process, visit this LaptopVideo2Go Forum Post

Here are some additional information that might be useful to an interested flasher

The board is up and running in the ESXi host now and I will run some benchmarks to compare the performance difference between a Datastore image, a Raw Device Mapped (RDM) drive and a drive connected to the LSI controller and passed through to the VM.